CentOS 编译安装nginx,安装第三方模块
概括
1、下载nginx 2、取消debug模式(可以省略) 3、配置nginx编译参数 4、编译安装 5、增加用户和用户组 6、sbin,nginx的启动、停止命令 7、启动报错 8、设置开机自启动 9、查看安装信息 10、安装第三方模块
1、下载nginx
选择比较稳定,比较新的版本哦, 下载列表:http://nginx.org/download
# 切换到需要下载到的目录
cd /usr/local/src/
wget http://nginx.org/download/nginx-1.12.2.tar.gz

# 解压
tar -xzvf nginx-1.12.2.tar.gz
2、取消debug模式
cd nginx-1.12.2
vi auto/cc/gcc

将这句注释掉 取消Debug编译模式 大概在172行
#CFLAGS="$CFLAGS -g"
3、配置nginx编译参数
进到刚刚解压的nginx-1.12.2目录下 cd nginx-1.12.2 进行configure配置,命令如下:
./configure –-user=www –-group=www --prefix=/usr/share/nginx --sbin-path=/usr/sbin/nginx --modules-path=/usr/lib64/nginx/modules --conf-path=/etc/nginx/nginx.conf --error-log-path=/var/log/nginx/error.log --http-log-path=/var/log/nginx/access.log --http-client-body-temp-path=/var/lib/nginx/tmp/client_body --http-proxy-temp-path=/var/lib/nginx/tmp/proxy --http-fastcgi-temp-path=/var/lib/nginx/tmp/fastcgi --http-uwsgi-temp-path=/var/lib/nginx/tmp/uwsgi --http-scgi-temp-path=/var/lib/nginx/tmp/scgi --pid-path=/run/nginx.pid --lock-path=/run/lock/subsys/nginx --with-file-aio --with-http_auth_request_module --with-http_ssl_module --with-http_v2_module --with-http_realip_module --with-http_addition_module --with-http_xslt_module=dynamic --with-http_image_filter_module=dynamic --with-http_geoip_module=dynamic --with-http_sub_module --with-http_dav_module --with-http_flv_module --with-http_mp4_module --with-http_gunzip_module --with-http_gzip_static_module --with-http_random_index_module --with-http_secure_link_module --with-http_degradation_module --with-http_slice_module --with-http_stub_status_module --with-http_perl_module=dynamic --with-mail=dynamic --with-mail_ssl_module --with-pcre --with-pcre-jit --with-stream=dynamic --with-stream_ssl_module --with-debug --add-module=/usr/local/src/nginx-http-concat-master
参数说明:
--user = 指定用户;
-–group = 指定组;
--prefix = 安装路径;
--sbin-path = sbin的路径;
--modules-path = 模块的路径;
--conf-path = 配置文件路径;
--error-log-path = 错误日志路径;
--http-log-path = 请求日志路径;
--with-xxx_module 编译的模块;
--add-module = 第三方模块;
./configure出错处理
3.1 /configure: error: the HTTP rewrite module requires the PCRE library.
解决方法:安装pcre
yum -y install pcre pcre-devel
3.2 缺少ssl错误,错误信息如下:
./configure: error: the HTTP cache module requires md5 functions
from OpenSSL library. You can either disable the module by using
--without-http-cache option, or install the OpenSSL library into the system,
or build the OpenSSL library statically from the source with nginx by using
--with-http_ssl_module --with-openssl=<path> options.
解决方法:安装openssl
yum -y install openssl openssl-devel
3.3 缺少编译器,错误信息如下:
./configure: error: C compiler cc is not found
解决方法:安装gcc-c++
yum -y install gcc-c++ autoconf automake
autoconf是自动配置,automake是自动编译
3.4 缺少zlib包,错误信息如下:
./configure: error: the HTTP gzip module requires the zlib library.
You can either disable the module by using –without-http_gzip_module
option, or install the zlib library into the system, or build the zlib library
statically from the source with nginx by using –with-zlib=<path> option.
解决方法:安装zlib
yum install -y zlib-devel
3.5 确实libxml2,错误信息如下:
./configure: error: the HTTP XSLT module requires the libxml2/libxslt
libraries. You can either do not enable the module or install the libraries.
解决方法:
yum -y install libxml2 libxml2-dev
yum -y install libxslt-devel
3.6 http_image_filter_module是nginx提供的集成图片处理模块,
需要gd-devel的支持,错误信息如下:
./configure: error: the HTTP image filter module requires the GD library.
You can either do not enable the module or install the libraries.
解决方法:
yum -y install gd-devel
3.7 缺少ExtUtils,错误信息如下:
./configure: error: perl module ExtUtils::Embed is required
解决方法:
yum -y install perl-devel perl-ExtUtils-Embed
3.8 缺少GeoIP,错误信息如下:
./configure: error: the GeoIP module requires the GeoIP library.
You can either do not enable the module or install the library.
解决方法:
yum -y install GeoIP GeoIP-devel GeoIP-data
4、编译安装
make
make install
5、增加用户和用户组
groupadd -f www
useradd -g www www
6、sbin,nginx的启动、停止命令
cd /usr/sbin/
./nginx
./nginx -s stop
./nginx -s quit
./nginx -s reload
./nginx -s quit:此方式停止步骤是待nginx进程处理任务完毕进行停止。 ./nginx -s stop:此方式相当于先查出nginx进程id再使用kill命令强制杀掉进程。
7、启动报错
7.1 启动时报80端口被占用:
nginx: [emerg] bind() to 0.0.0.0:80 failed (98: Address already in use)
解决办法:
第一种解决方法:安装net-tool 包:yum install net-tools
1.先停止再启动(推荐): 对 nginx 进行重启相当于先停止再启动,即先执行停止命令再执行启动命令。如下: ./nginx -s quit ./nginx 2.重新加载配置文件: 当 ngin x的配置文件 nginx.conf 修改后,要想让配置生效需要重启 nginx,使用-s reload不用先停止 ngin x再启动 nginx 即可将配置信息在 nginx 中生效,如下: ./nginx -s reload
第二种解决方案:查看80端口占用程序,kill掉
确保系统的 80 端口没被其他程序占用 查看端口命令:
netstat -ano|grep 80
# 或
lsof -i:80
然后 kill -9 PID
8、设置开机自启动
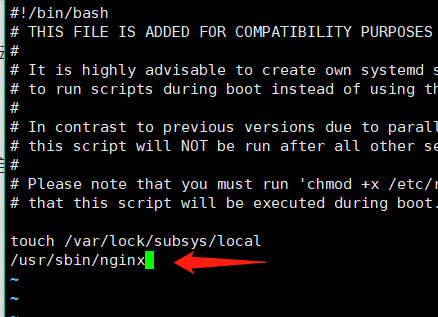
即在rc.local增加启动代码就可以了。
vi /etc/rc.local
最底下增加一行 /usr/sbin/nginx
 设置执行权限,命令:
chmod 755 rc.local
9、查看安装
查看命令: nginx -V #查看安装了哪些模块 nginx -v #查看版本号
10、安装第三方模块
在./configure 后面加上 --add-module = 第三方模块 即可 比如 安装 淘宝js/css 资源合并模块: 第一步:下载
cd /usr/local/src/
# 下载 第三方模块
wget https://github.com/alibaba/nginx-http-concat/archive/master.zip -O nginx-http-concat-master.zip
# 解压
unzip nginx-http-concat-master.zip
第二步:./configure加载
./configure –-user=www –-group=www ....(省略其它配置信息) --add-module=/usr/local/src/nginx-http-concat-master
然后重新编译,并替换原来的sbin/nginx文件(记得备份哦😄) 可以参考《yum安装的nginx或者编译安装的nginx,添加模块》
总结
1、下载nginx 2、取消debug模式(可以省略) 3、配置nginx编译参数 4、编译安装 5、增加用户和用户组 6、sbin,nginx的启动、停止命令 7、启动报错 8、设置开机自启动 9、查看安装信息 10、安装第三方模块
the End.